Over the years, weavers have woven a lot of blue jean rugs at the Appalachian Arts Crafts Center. We have a couple of looms that are particularly suited to this kind of weaving. Large sturdy looms that can stand up to that kind of work.
Once the rugs leave the center, however, they are generally put on the floor, where they are walked on, and any number of things might happen to them. Sometimes they are even put in the washer, which since we are fond of wool warp yarn, they come out a bit worse for it. Another hazard that is frequently run is in the 4 footed variety. That was the case of a rug that was brought to us for repair a couple of weeks ago.
 Sometimes we decide to take the rug completely apart and re weave it, but this time since the damage is limited to the edges, it was decided that I would needle weave it.
First I had to find a yarn that matched the wool that was used in the rug. I matched the color easily enough, but the wool yarn was way too thick, so, I had to split the yarn in half.
 I isolated the damage with clothes pins and I began to needle weave, with a tapestry needle, the replacement warp up into the body of the rug. I left enough of the wool down below to replace the wool hem and fringe.
 With the body of the rug re-woven, I replaced the wool hem stitching, needle weaving a bit of the new yarn into the old hem about 3 inches so that the hem would be stable, and retied the knots.

Once the fringe is cut, a non weaver would never even see the repair!
 The second side, I thought was going to be a bit trickier, because it had damage going up the side of the rug.
 Luckily though, there was enough old warp left in the rug, that I was able to re-weave down just to where the hem would have been, giving me a good foundation to work with.
 You can see that the re weaving has been done on the body, you can also see the ends of the old warp sticking out down below, and the new warp sticking out above, but I hadn't replaced the wool hem yet. Once the hem was done, I stagger the yarn ends a bit so that they don't all end at the same place and I trim them off. I then adjusted the spacing of the new yarn to match the spacing as closely as possible to the original.
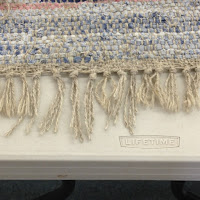
 Terribly out of focus, but you can see that the hem has been replaced and the fringe has been trimmed. Again, a non weaver will probably never realize that a repair had been done.
This project took about 7 hours from start to finish, but since the damage was limited to the hem area, and the fact that we did not have a loom dressed with the proper color warp, needle weaving was the way to go.
Last Tuesday, after I finished this rug repair, I was able to go back to "my" loom, (it's been awhile since I have been able to sit at that loom, there is always something else going on!). I had just enough time to remember that I was having trouble with the selvedges and to un-weave back to a glaring mistake in the overshot baby blanket I had on the loom. But that gives me a clean slate to go back to next Tuesday!
Until next time, Happy Weaving, Tina
Once the rugs leave the center, however, they are generally put on the floor, where they are walked on, and any number of things might happen to them. Sometimes they are even put in the washer, which since we are fond of wool warp yarn, they come out a bit worse for it. Another hazard that is frequently run is in the 4 footed variety. That was the case of a rug that was brought to us for repair a couple of weeks ago.

First I had to find a yarn that matched the wool that was used in the rug. I matched the color easily enough, but the wool yarn was way too thick, so, I had to split the yarn in half.
 I isolated the damage with clothes pins and I began to needle weave, with a tapestry needle, the replacement warp up into the body of the rug. I left enough of the wool down below to replace the wool hem and fringe.

Once the fringe is cut, a non weaver would never even see the repair!


This project took about 7 hours from start to finish, but since the damage was limited to the hem area, and the fact that we did not have a loom dressed with the proper color warp, needle weaving was the way to go.
Last Tuesday, after I finished this rug repair, I was able to go back to "my" loom, (it's been awhile since I have been able to sit at that loom, there is always something else going on!). I had just enough time to remember that I was having trouble with the selvedges and to un-weave back to a glaring mistake in the overshot baby blanket I had on the loom. But that gives me a clean slate to go back to next Tuesday!
Until next time, Happy Weaving, Tina
2 comments:
It was fascinating to see this in progress...I'm glad you remembered to take pictures as you worked.
Wonderful job on the repair.
Post a Comment